Note: The Processing App is unique in that it can be used completely offline until you are ready to complete the session. Data is saved on the device until it is able to upload the information when it is connected to the internet. Upon session completion you will need a reliable internet connection to ensure the information is saved.
Note: If you are treating cattle for the first time using the Processing App, be sure you have added the group in the Performance Beef Webview before starting the session and connected to the internet.
Setting up the Session:
- From the Webview portion of the Performance Beef app, select the Scale App button in the upper left corner.
- Click the three horizontal bars in the upper left corner and select Processing App.
- Click the green Start New Session on the bottom center of the screen.
- Select your scale by clicking the white Select Scale box on the left side of the screen, below the weight readout.
- To pair sequential visual IDs to an EID, please refer to the Visual ID Settings.
Note: If using low frequency tags, pair your wand with scale via Bluetooth before you bring the cattle to the chute.
Selecting Costs:
- From the upper right, select Actions then the red Edit button.
- Select Costs in the upper left corner of the Edit Actions pop-up.
- Select the costs for the animal(s) by tapping the + symbol on the right of each desired cost. Costs selected will appear in the list at the bottom.
- Assign quantities and select the per head or per CWT divider for each cost in the white boxes to the right of each cost.
Note: If per cwt, the system will recalculate the dose with each animal coming through depending on the weight captured by the scale. Use per head and a fixed dose based on group weight if you do not want dose adjusted with each animal.
4. When all costs are selected with quantities assigned, tap the red Continue button in the lower right corner.
Note: The costs selected will default to “Auto-Apply” to each animal during the session. To remove a cost from automatically applying to each animal, tap the toggle to the right of that line item to turn it off. It will appear grey with the circle to the left when turned off. If you would like to apply a cost to a particular animal, ensure the checkbox is checked on that line item before saving or before the animal walks off the scale.
Selecting Group or Animal Details:
- Before processing new animals (animals processed using the Processing App for the first time), a Group ID is required whereas an animal will save without gender, yellow screen indicates this data is missing. Be sure you have added the group in the Performance Beef Webview before processing and connected to the internet.
- If animals have been processed before using the Processing App, neither the Group ID nor gender need to be selected.
Once the scale has been selected in the Select Scale box on the left side, your costs are added in and Group ID and gender are selected (for new animals), you are ready to process!
Start the Processing Session:
Ultra-High frequency tags:- As the animal enters the chute the POINT will begin weighing.
- Weighing continues until a tag is read.
- Weight is locked once the tag is read.
- If the weight is incorrect for any reason, click the Rescan button on the lower-right corner.
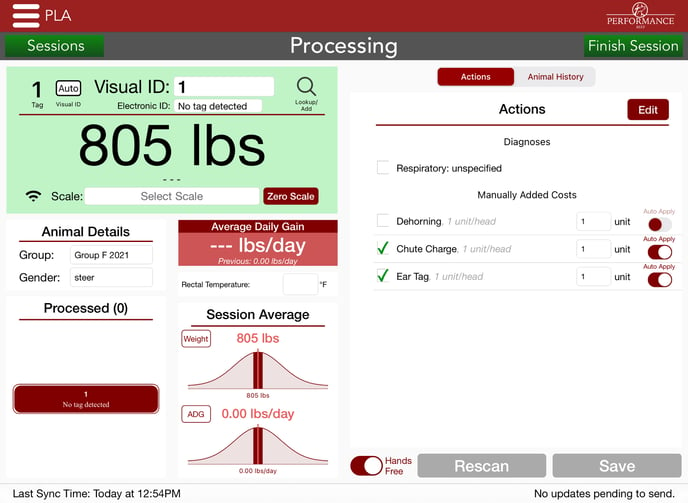
- Confirm processing charges are all correct. Checkmarked items will be applied.
- To apply a diagnosis, select Actions then the red Edit button.
- With Diagnoses selected in red at the top, select diagnosis(ses) by tapping the + symbol to the right of each diagnosis. The selected diagnoses will appear at the top of the Actions list at the bottom.
- When in Hands-Free Mode (toggle at the bottom center), animal records are saved as the animal exits the chute and a significant weight decrease is sensed by the scale.
- If Hands Free is off (grey), click the red Save button before the animal walks out.
- Repeat these steps for each animal.
- If you need to go back to a previously saved animal, select the animal under Processed in the lower left corner, make changes as needed, turn off Hands-Free Mode, then tap Save. Be sure to turn Hands-Free back on if needed.
Low frequency (button) tags:
- Weighing will begin as the animal enters chute and locks as scale settles.
- If a reweigh is needed push the play button on the POINT and rescan the tag.
- Scan the EID anytime during processing.
- If you want to pair a visual ID to the EID, first be sure the animal is weighed and scanned and the scale is locked. Then clear the visual ID field and enter the visual tag number at initial processing. When the animal returns to the chute both IDs will show.
- Confirm processing charges are all correct. Checkmarked items will be applied.
- To apply a diagnosis, select Actions then the red Edit button.
- With Diagnoses selected in red at the top, select diagnosis(ses) by tapping the + symbol to the right of each diagnosis. The selected diagnoses will appear at the top of the Actions list at the bottom.
- When in Hands-Free Mode (toggle at the bottom center), animal records are saved as the animal exits the chute and a significant weight decrease is sensed by the scale.
- If Hands Free is off (grey), click the red Save button before the animal walks out.
- Repeat these steps for each animal.
- If you need to go back to a previously saved animal, select the animal under Processed in the lower left corner, make changes as needed, turn off the Hands-Free Mode, then tap Save. Be sure to turn Hands Free back on if needed.
Complete Processing Session:
- When all animals are complete, tap the green Finish Session button in the upper right corner.
- Tap Finish in the lower right corner after reviewing the data.
- Pending updates will appear in the lower right corner. Updates will be saved locally on the device until it connects to the internet. Be sure your device has a solid internet connection for these updates to sync/upload to the cloud . Do not force quit the Performance Beef app or shut down your device until there are No Pending Updates.
Learn how to view and export session reports here.
Combining the Processing App with a scale, antibiotic and dewormer doses are accurately and automatically calculated and recorded. When a session is complete, the practices and costs associated with each animal are added to each animal in the group and are reflected on invoices and closeouts in real-time. No more double data entry, ensuring accurate and timely accounting for costs.
Our Customer Success team is here to help. If you have questions, call us at 515-337-2187 or email us at support@cattlekrush.com. Be sure to take advantage of our complete resource library and how-to videos created to help you succeed.
Using Automated Visual ID Settings to Pair Visual IDs to Electronic IDs - Customize your visual IDs while processing with EID tags.
Low Frequency Wand Compatibility - Read this article for more information regarding compatible wands.
Animal Health Tags & Equipment Installation - Learn about our UHF tags and how to install your processing hardware here.