Note: The Processing App is unique in that it can be used completely offline until you are ready to complete the session. Data is saved on the device until it is able to upload the information when it connects to the internet. Upon session completion you will need a reliable internet connection to ensure the information is saved.
Note: If you are treating cattle for the first time using the Processing App, be sure you add the group in the Performance Beef Webview while connected to the internet and before starting the session.
Start the Session:
- From the Webview portion of the Performance Beef App, select the Scale App button in the upper left corner.
- Tap the three horizontal bars in the upper left corner and select Processing App.
- Tap the green Start New Session on the bottom center of the screen.
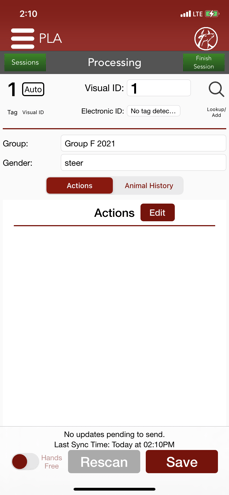
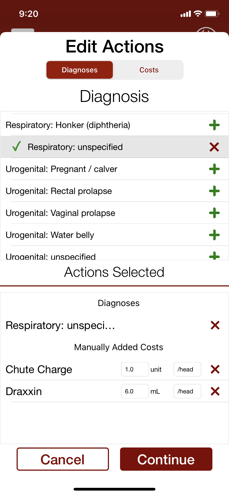
- Select Actions then the red Edit button to enter a diagnosis and/or apply costs.
- With Diagnoses selected in red at the top, select diagnosis(ses) by tapping the + symbol to the right of each diagnosis. Diagnoses selected will appear in the list at the bottom on an iPhone or to the right on iPad.
- With Costs selected in red at the top, select the costs for the animal(s) by tapping the + symbol on the right of each desired cost. Costs selected will appear in the list at the bottom on an iPhone or to the right on iPad.
- Assign quantities and select the per head or per cwt depending on product and dose divider for each cost in the white boxes to the right of each cost.
- When all diagnoses and costs with quantities assigned are selected, tap the red Continue button in the lower right corner.
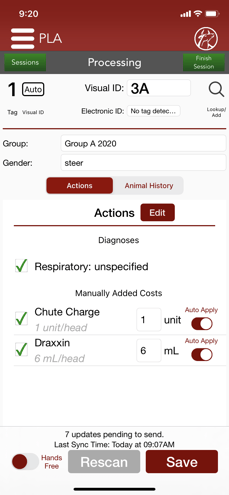
Note: The costs selected will default to “Auto-Apply” to each animal during the session. To remove a cost from automatically applying to each animal, tap the toggle to the right of that line item to turn it off. It will appear grey with the circle to the left when turned off. If you would like to apply a cost to a particular animal, ensure the checkbox is checked on that line item before saving.
Note: For an animal to appear as a pull on the Animal Health tab or in the Analytics, a Diagnosis must be applied.
5. Tap the Lookup/Add magnifying glass at the top of the screen.
-
- Select or Create an animal:
- Select an existing ID from the list. You can use the search box or the filter box to find an animal.
- Create a new animal by entering a visual ID then tap Create.
- Select or Create an animal:
-
-
-
- Select the Group ID and a gender for the new animal just below the ID(s) on an iPhone or under Animal Details on an iPad.
-
-
6. Select Animal History to view previous treatments and notes for existing animals (new animals will not have any history to report).
7. Diagnoses and Added Costs will persist under Actions. To apply a diagnosis and/or added costs to an animal, click the checkbox to the left of each item.
8. If you would like to enter a weight, tap on 0 lbs under Animal Details on an iPhone or below the IDs on an iPad three times and manually enter a weight. A weight is required for weight- based products/ those applied per cwt.
9. Tap the red Save button when all treatments are complete for each animal.
10. Repeat these steps for each animal starting at step 4.
a. If you need to go back to a previously saved animal, select the animal under Processed, make changes as needed then tap Save.
Complete Treatment Session:
- When all animals have been treated, tap the green Finish Session button in the upper right corner.
- Tap Finish in the lower right corner after reviewing the data.
- Pending updates will appear in the lower right corner. Updates will be saved locally on the device until it connects to the internet. Be sure your device has a solid internet connection for these updates to sync/upload to the cloud . Do not force quit the Performance Beef app or shut down your device until there are No Pending Updates.
Learn how to view and export session reports here.
When a session is complete, the treatments, associated costs and/or diagnoses are recorded for each animal in the session and reflected in Performance Beef in real-time. Diagnosing and treating cattle with the Processing App allows you to manage animal health on an individual basis while providing you information needed to find potential health correlations through the Analytics tab. Learn more here: Animal Health Related Analytics.
Our Customer Success team is here to help. If you have questions, call us at 515-337-2187 or email us at support@cattlekrush.com. Be sure to take advantage of our complete resource library and how-to videos created to help you succeed.
Working Cattle with Processing App - Read this article to learn how to use the Processing App while working cattle.
Navigating Animal Health Webview - Read this article to learn more about the information available before or after processing and checking cattle on the Health tab.
Running & Exporting a Processing Report - Learn how to run and export a processing report for a single or multiple processing events.